Setting up a web-to-app banner: Step-by-step


For mobile advertisers, there are mobile apps, desktop and the often neglected, potentially rich gold mine of ad real estate called the mobile web.
As a mobile app developer, I can understand why this space is overlooked: it’s like desktop with a bad user experience and limited processing power.
However, mobile web is key because it’s a cost-effective and convenient way to convert high quality web users into highly engaged and loyal app users.
The trick to funneling users to your mobile app from the mobile web is to use an unintrusive but attractive banner and AppsFlyer’s new Banner Generator which makes building a mobile web banner so much easier and faster.
Adding the banner code to your website is extremely simple, even for mobile developers who aren’t that familiar with web layouts.
Now, let’s get into the step-by-step tutorial on how to configure a web-to-app banner using AppsFlyer’s deep linking solution, OneLink.
Step 0: Configure your OneLink
First, go to the configuration section of your AppsFlyer Dashboard and click on Configure OneLink. Follow the wizard to create a new OneLink.
While the deep linking scheme is not mandatory, it is strongly recommended. This scheme will define the routing flow so that AppsFlyer knows where to send your user in every scenario.
To create a deep linking scheme and add powerful, deep linking capabilities to your banner, follow our guide.
Once your OneLink is configured, retrieve the OneLink ID on the main OneLink Configuration page and the new (one)link created, you will need it later on.
Step 1: Get the pre-built banner code
Download the pre-built banner code.
Open the zip file it and grab everything but: LICENSE, demo.html and Read.me files (as they’re not needed).
Drop these files into your website root directory.
Step 2: Create a new banner file
Create a new file called banner.js (this file will contain the banner activation code we are going to configure in STEP 3).
Put this banner.js file inside your js (javascript) folder in your main directory.
The folders’ layout should look like this:
project/
  ├── css/
  |   └── style.css
  ├── js/
  |   └── banner.js
  └── index.html
Step 3: Customize Your Banner
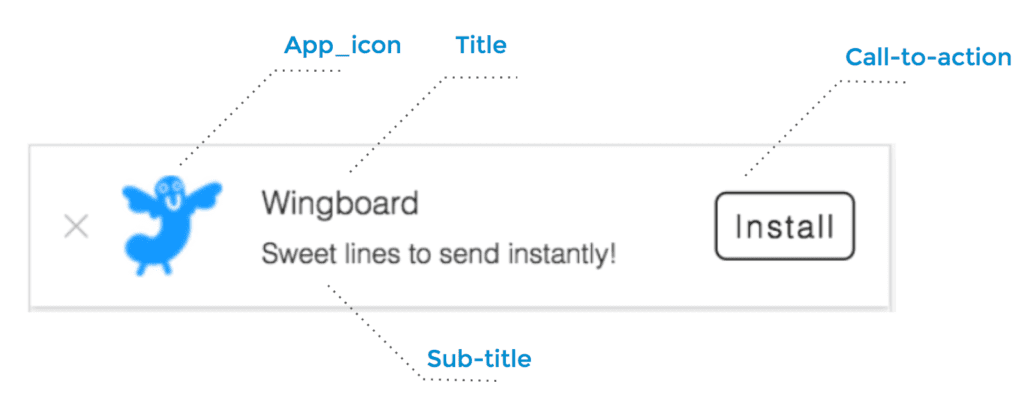
For the purpose of this tutorial, I have created a Web-to-App banner for an app called ‘WingBoard’.
For creating this banner I have configured my banner settings as follows:
Here’s the code I used for creating my ‘Windboard‘ Web-to-App banner. Make sure to customize all highlighted parameters to match your own brand and don’t forget to add the OneLink ID and deep link we’ve grabbed earlier to the routing settings!
var banner = new AFBanner();
     var settings = {
   // banner settings
   title: "Wingboard",
   subtitle: "Sweet lines to send instantly!",
   app_icon: "img/app_icon.png",
   call_to_action: "Install",
   show_only_mobile: true,


   // attribution settings
   media_source: "banner_pid",
   campaign: "banner_c",
   ad: "banner_ad",
   ad_id: "banner_ad_id",
   site_id: "banner_site_id",
   sub1: "banner_sub1",


   // routing settings
   onelink_id: "LniH",
   subdomain: "wingboard",
   mobile_deeplink: "wingboard://"
};
banner.init("my-banner", settings);
Take not of how I’ve set the media_source to be banner_pid in the attribution settings.
This will allow me to record my downloads within AppsFlyer dashboard, which is another great advantage of the mobile web banner!
Step 4: Activate the banner on your website
You’re almost finished!
The only thing left is to add some lines of codes to your website:
Add the following code to your file to enable the banner code within your app:
<p><code><span style="font-weight: 400;"><script type="text/javascript" src="appsflyer-banner.min.js"></script><br>
</span></code><code></code></p>
Finally, add this line of code to the of your webpage:
<div id="my-banner"> </div>By now, you should be finished and able to see your banner within your mobile webpage but…wait!
A minute before you send an email to your team about today being the most productive day of the quarter, make sure you don’t skip one critical step – testing your banner.
Step 5: Test your banner
Has the banner been added on your website?
If it hasn’t, make sure your OneLink was correctly configured (step 0) and that all mandatory parameters (in step 3) have been provided.
Can you see the banner across the right, desired platforms? Test with IOS, Android and desktop.
- If you wish to view the banner on both mobile AND desktop, set your banner settings to:
show_only_mobile: false - If you wish to view the banner on mobile ONLY, set your banner settings to:
show_only_mobile: true
Is the banner link working? Is it routing you to the app store or to your app?
If your banner link is broken, make sure that the OneLink subdomain set in routing settings (step 3) is identical to the subdomain defined in the OneLink configuration (step 0). Any mismatch between the subdomain defined in the banner and the one defined in the OneLink Configuration will result in a broken link!
All done!


